A PHP Developer in The JavaScript World
| Table of contents |
|---|
Foreword
How to setup a JavaScript (JS) project in a proper way? In this article we create a simple form with a file upload, email sending with attachments and a MySQL database connection. We'll use Node.js, Express, Grunt, Jasmine, Bower, Bootstrap and many other libraries.
- 2025-10-26 Grammar is checked.
- 2021-12-05 Grammar is checked.
- 2018-01-05 Added recommendations of more modern technologies when appropriate: nvm, hapi.js, Webpack, pm2.
- 2014-09-23 Text is published.
- 2014-09-19 Text is started.
Disclaimer
While reading articles about angular, nodejs and so on we can see an endless number of different components and modules like npm, grunt, express, grunt-express, bower and grunt-bower. It's not trivial to find out what is really needed so sometimes the best we can do is educated guesses. There are public projects offering everything in one shot, such as MEAN (reference) or Yeoman (reference), but it's usually a good idea to build the stack once by yourself.
The reader is expected to know the basics of the web development in general, preferable also some HTML, CSS and JS. If not, the reader can of course just copy-paste the code samples on this page but the possible errors can be hard to solve without prior knowledge.
Why angular? Because it's leading the frontend JS framework battle (reference).
The project source codes are available but the commits are not strictly following the progress of this article (reference).
Motivation
In year 2014 the background of the writer of this article is LAMP (Linux/Debian, Apache, MySQL/PostgreSQL, PHP) plus some JavaScript (jQuery, Backbone).
Web developing world is moving towards event-based programming, so let's focus on the JavaScript part today (JS) (reference).
Objective
Our objective is to create a simple web form using AngularJS and Node.js. We want to have both development and production environments. The workflow to build the versions must be an easy task to do. In addition we want to have both unit and end-to-end tests (E2E). Data will be in a MySQL database because that's very common in web applications.

The final version of the application will look like this.
Debian
First we need a development environment and a working directory. I have a Debian Squeeze (6.0).
$ sudo mkdir /var/www/simpleform
$ sudo chown username:username /var/www/simpleform
$ chmod -R 755 /var/www/simpleform/
Node.js and npm
Node.js makes it possible to run JS applications in the backend (server-side) (reference) and many of the components in this project require it. We also need npm to be able to easily install other node modules (reference).
UPDATE (2018): Check out nvm (reference).
It's recommended to fetch node directly from the repository and compile it by yourself because the software is evolving rapidly. Therefore first install git if you didn't already have it (reference).
Then change your working directory to where you can download the source code files of Node.js.
$ cd /opt
/opt is a preferrable (and ancient) way to store 3rd party software's source code but you can use your home directory as well (reference). It's just a temporary place for the source code files. The actual binaries are generated in latter steps.
# download source code files
$ git clone https://github.com/joyent/node.git
# list versions
$ git tag
# currently the latest stable version is 0.10.32 (reference)
$ git checkout v0.10.32
$ ./configure
$ make
$ sudo make install
# test
$ node -v; npm -v
v0.10.32
1.4.28
Next we create a package.json file which contains the meta data of the application.
$ cd /var/www/simpleform
$ npm init # creates package.json
Express
UPDATE (2018): Check out hapi.js (reference).
express is a node framework and in this project it will be the platform for the backend codes, meaning the code is running in a server, not in a browser like a frontend code does. Express gives helpers for things like MySQL connection and email sending.
# find out the latest stable version
$ npm info express version
$ npm install express@4.9.3 --save
The --save flag adds the module to the package.json. The file format is quite comprehensive but ^4.9.3 means all the versions after 4.9.3 and before 5.0.0 (reference).
Then we can write the first version of the backend application.
$ vim server.js # (BONUS) set the filename in the package.json's "main"
var express = require('express');
var app = express();

app.get('/', function(req, res) {
    res.send('Omenapa ovela');
});

var server = app.listen(3000, function() {
    console.log('Listening on port %d', server.address().port);
});
After saving the file and running the application we should see the Omenapa ovela text in http://domain.com:3000.
# run the backend application
$ node server.js

Application is running.
nodemon
When developing the backend application we don't want to manually restart the application everytime the code is changed. For this problem we use the nodemon module (reference).
$ npm install nodemon --save
$ nodemon server.js
After nodemon is installed it will be used instead of node. We can test it by running the command in one terminal and edit the source code in another terminal. The application should restart automatically when the file is saved.
Bower
UPDATE (2018): bower is not needed anymore. npm handles both the frontend and backend modules.
Another package manager, after npm, is needed for the front-end: bower (reference) (reference).
$ npm install bower --save
$ bower init # creates bower.json
AngularJS
Finally it's time to install angular. A --save flag adds the component to the bower.json.
$ bower install angular --save
Next we make angular working on the page. Create an index.html and update the server.js. We also need a new node module: path (reference).
$ vim index.html
<doctype html>
<html ng-app>
    <head>
        <script src="angular/angular.min.js"></script>
    </head>
    <body>
      <p>Your name: <input type="text" ng-model="name"></p>
      <p>Hello !</p>
    </body>
</html>
$ vim server.js
var express = require('express');
var app = express();
var path = require('path');

var router = express.Router();
app.use(router);

router.use(express.static(path.join(__dirname, 'bower_components'))); // location of angularjs

router.use(function(req, res){
    res.sendFile(path.join(__dirname, '/index.html'));
});

var server = app.listen(3000, function() {
    console.log('Listening on port %d', server.address().port);
});
$ npm install path --save
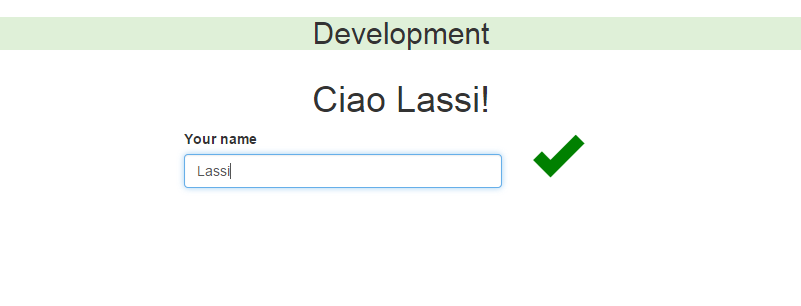
Then we should have a working angular page in http://domain.com:3000. There's an input field where you can write your name which is displayed on the page in real time. This is called two way data binding.

Two way data binding in use.
Because all the application routes are handled in AngularJS we need only one page: index.html.
The discussion of the route conventions is still open (reference). The current suggestion uses #! notation.
Bootstrap
For user interface we use bootstrap (reference).
$ bower install bootstrap
Let's add some candy to the page. Later we will see how to compress and minify CSS and JS files.
$ vim index.html
<html lang="en" ng-app>
<head>
    <meta charset="utf-8">
    <meta http-equiv="X-UA-Compatible" content="IE=edge">
    <meta name="viewport" content="width=device-width, initial-scale=1">
    <link href="bootstrap/dist/css/bootstrap.min.css" rel="stylesheet">
    <link href="custom.css" rel="stylesheet">
</head>
<body>
    <div class="container">
        <div class="row">
            <h1 class="text-center">Ciao !</h1>
        </div>
        <div class="row">
            <div class="col-sm-4 col-sm-offset-4">
                <form role="form">
                    <div class="form-group">
                        <div class="row">
                            <div class="col-sm-9">
                                <label for="name">Your name</label>
                                <input type="text" ng-model="name" class="form-control" id="name">
                            </div>
                            <div class="col-sm-3">
                                <span ng-show="name" class="glyphicon glyphicon-ok nameGiven"></span>
                            </div>
                        </div>
                    </div>
                </div>
            </form>
        </div>
    </div>
    <script src="angular/angular.min.js"></script>
    <script src="jquery/dist/jquery.min.js"></script>
    <script src="bootstrap/dist/js/bootstrap.min.js"></script>
</body>
</html>
$ vim bower_components/custom.css # strange directory, but don't worry about it for now
.nameGiven {
    color: green;
    font-size: 50px;
}

Bootstrap in use.
File structure
Okay, now we should have enough files to think what could be an optimal file structure. At the moment the application's business logic is divided into just two files (server.js, index.html) which both locate in the root directory. In addition we have one extra CSS file (bower_components/custom.css).
Because the application will expand, we want to make a clear separation between the client (frontend) and server (backend) files. We also need three environments: dev, dist and test. In addition we need own directory for the actual source codes (src) as well as for the local data (data). spec and coverage will be needed in unit testing and tmp is a temporary working directory.
Now, go and reorganize your current three files (server.js, index.html, custom.js) according to the new structure.
bower_components/                   # frontend modules installed by bower
    angular/
        angular.js
        angular.min.js
        ...
    bootstrap/
    ...
bower.json                          # bower settings and dependencies
coverage/                           # code coverage report files
data/                               # json:s etc.
dist/                               # a distribution (release, build) to be deployed in production/staging/testing
dev/                                # a running development version
Gruntfile.js                        # grunt settings (will be created later)
node_modules/                       # backend modules installed by npm
    express/
    nodemon/
    ...
package.json                        # backend settings and dependencies
spec/
    unit/
        client/                     # unit tests for client
            controllers.js
        server/                     # unit tests for server
            server.spec.js
    e2e/
    data/                           # sample data for tests
src/                                # the actual editable source code files of the application
    client/                         # client, frontend, ui
        index.html                  # landing page (later index.jade)
        css/
            custom.css
        js/                         # angular logics
            main.js
            controllers.js
            ...
        partials/                   # view partials
            form.html
            ...
    server/                         # server, backend
        config.sample               # skeleton for config
        server.js
test/                               # running version for tests
tmp/                                # working directory for Grunt
After reorganizing the files we have to update the paths in server.js and index.html. To save some internet space, I list only the relevant lines here.
router.use(express.static(path.join(__dirname, '../../bower_components')));
router.use(express.static(path.join(__dirname, '../client')));
...
res.sendFile(path.join(__dirname, '../client/index.html'));
<link href="css/custom.css" rel="stylesheet">
After these changes we must re-run the server code from the src directory.
$ nodemon src/server/server.js
Using git is not in the scope of this article but it should be enough to add only bower.json, package.json, Gruntfile.js, src/, data/ and spec/ to the repository. There are counter-arguments though (reference). The installation specific config files must be manually written when a new installation is created but more about this in the next chapter.
Environments
As told in the Introduction chapter, we are mimicing a real world software project, so we need to have different environments for different purposes during the development process. At this point the software is run directly from the src directory which is not ideal.
First, let's clarify a few terms.
A development environment is the one a developer is using during the developing process. This is where the verbose debug flag is on, logging is comprehensive and the code files are in human readable format.
When the developer is ready, he (or she) makes a distribution (sometimes called build) to be transfered for other people to first review the code and later to upload it for the public to use in a real application. The public environment is called production (or live).
In addition to the development and production environments there are usually at least one testing (or staging) environment where a limited group of trusted people can test the software before it's released to the public.
To ease the debugging it's a good idea to not have the files minified in the testing environment, at least not in the development environment.
When the developer has fixed all the bugs found during the review process, a new special distribution is built, a release candidate (RC). Now the CSS and JS files should be minified to mimic the real end-user experience. Sometimes there can be several testing phases and own environments for each, such as alpha, beta and demo.
When the testing phase is done and the new code is ready to be deployed to the production, the distribution is called stable. A stable release can be transfered to the production.
No matter of the environment, a running application is also and always an installation that has own settings file, usually called config. It's the file where things like the credentials to the other systems are told, such as databases, or host names, ports, email settings, password salts. Also the debug logging level already mentioned usually goes to the config file.
The presented ideas above isn't the only way to do the environment architecture but it's one very common, although in a real world the different installations are not in the same directory, not even in the same server, except the temporary test installations which are created automatically by the system.
Take a note that a test and a testing environments are not the same thing. The test environment is automatically created for a short period of time when the automation tests are run. In contrary, the testing environment means an environment where real people can manually test the application before the release is labeled stable. Because of the word conflict it's a good idea to use a term "staging" instead of "testing" for the staging environment.
So, what we need today are three directories in the file structure: one for the running development version (dev), one for the built distributions (dist) and one for the automatic tests (test). In addition we need own configuration files for each installation.
Because this software project is so simple, we skip the staging environment and also run the production version directly from the dist directory. In a bigger project we would transfer the stable release to a production server.
Later there will be three different config files (dev/server/config, dist/server/config, test/server/config) but for now we need just one (src/server/config).
$ vim src/server/config
var config = {};

config.env = 'dev'; // dev/prod/test/testing/staging/...
config.host = 'localhost';
config.port = 3001; // 3000 for prod, 3002 for test
config.basePath = '/var/www/simpleform/';
config.dataPath = config.basePath + 'data/';

config.mysql = {};
config.mysql.host = 'localhost';
config.mysql.database = '';
config.mysql.user = '';
config.mysql.password = '';

config.gmail = {};
config.gmail.username = '';
config.gmail.password = '';

config.email = {};
config.email.fromName = '';
config.email.fromEmail = '';
config.email.to = '';
config.email.subject = '';

module.exports = config;
A special file called config.sample (or config.default) is good to have in the repository for a good developer experience. The file is a skeleton file containing empty (or default) values. When a new installation is initialized the config.default is manually copied as a new file called config and filled by the installation specific values.
Next we create a landing page, a bootstrap file of the application (index.html). We are going to use jade as well, a node templating language which supports conditions, to show if the page is not running in production (reference).
$ npm install jade --save
$ mv src/client/index.html src/client/index.jade
$ vim src/client/index.jade
doctype html
html(lang="en", ng-app)
    head
        meta(charset="utf-8")
        meta(http-equiv="X-UA-Compatible", content="IE=edge")
        meta(name="viewport", content="width=device-width, initial-scale=1")
        link(href="bootstrap/dist/css/bootstrap.min.css", rel="stylesheet")
        link(href="css/custom.css", rel="stylesheet")
    body
        .container
            .row
            if is_prod
                h2(class="text-center bg-danger") Production
            else if is_test
                h2(class="text-center bg-danger") Test
            else
                h2(class="text-center bg-success") Development
        .row
            h1(class="text-center") Ciao !
        .row
            div(class="col-sm-4 col-sm-offset-4")
                form(role="form", name="simpleform")
                    .form-group
                        .row
                            .col-sm-9
                                label(for="name") Your name
                                input(type="text", ng-model="name", class="form-control", id="name")
                            .col-sm-3
                                span(ng-show="name", class="glyphicon glyphicon-ok nameGiven")
    script(src="angular/angular.min.js")
    script(src="jquery/dist/jquery.min.js")
    script(src="bootstrap/dist/js/bootstrap.min.js")
The next commands generate own index files for each installation to show different notification banner.
$ jade -P -O "{is_prod: true}" < src/client/index.jade > src/client/index_prod.html # P = pretty html
$ jade -P -O "{is_dev: true}" < src/client/index.jade > src/client/index_dev.html # O = options
$ jade -P -O "{is_test: true}" < src/client/index.jade > src/client/index_test.html
server.js file needs to support the environment check, as well.
$ vim src/server/server.js
var express = require('express');
var app = express();
var path = require('path');

var router = express.Router();
app.use(router);

var config = require('./config');

router.use(express.static(path.join(__dirname, '../../bower_components')));
router.use(express.static(path.join(__dirname, '../client')));

router.use(function(req, res) {
    if (config.env == 'prod') {
        res.sendFile(path.join(__dirname, '../client/index_prod.html'));
    } else if (config.env == 'test') {
        res.sendFile(path.join(__dirname, '../client/index_test.html'));
    } else {
        res.sendFile(path.join(__dirname, '../client/index_dev.html'));
    }
});

var server = app.listen(config.port, function() {
    console.log('Listening on port %d', server.address().port);
});
Now we are supporting three environments: dev, prod and test. We still have to generate the index files manually but it will be fixed later. The notification bar should be telling now the environment depending on what we have in src/server/config file, in the env variable. The server needs to be restarted in order to see the change on the page.
The production version is running in http://domain.com:3000, the development version in port 3001 and the testing version in port 3002 (or whatever you wrote in the config file). In the real world we wouldn't use weird ports but had domains like http://dev.youdomain.com and http://domain.com but this is out of the scope of this article because that would need a web server, such as nginx.
A notification bar tells the environment: Development.
Grunt
UPDATE (2018): Check out webpack (reference).
A workflow of developing and building different versions of the application, must be an easy task to do. For this we have grunt (reference). Gulp is an alternative (reference).
Grunt is a task runner to perform various repetitive tasks such as concatenating, validating and minimizing files, running tests and creating distributions.
We need both grunt command line interface (CLI) and a local grunt task runner.
$ npm install -g grunt-cli --save-dev
$ npm install grunt --save-dev
--save-dev flag puts the omdules under the devDependencies in package.json because grunt is not needed in the production environment.
If you haven't created dev/server/config, dist/server/config and test/server/config yet, do so now. Copy the src/server/config and modify the env and port variables.
Gruntfile.js
Let's first install all the grunt modules that we are going to need. It's recommended to use only officially maintained grunt-contrib-* modules (reference).
$ npm install grunt-contrib-clean --save-dev
$ npm install grunt-contrib-jade --save-dev
$ npm install grunt-contrib-jshint --save-dev
$ npm install grunt-contrib-copy --save-dev
$ npm install grunt-contrib-watch --save-dev
$ npm install grunt-contrib-concat --save-dev
$ npm install grunt-contrib-uglify --save-dev
$ npm install grunt-contrib-cssmin --save-dev
$ npm install grunt-contrib-jasmine --save-dev
$ npm install grunt-jasmine-node --save-dev
$ npm install grunt-template-jasmine-istanbul --save-dev
Grunt tasks are configured, loaded and registered in the Gruntfile.js file. Let's create it. There are a lot of stuff which we don't need right now, so you can ignore the lines you don't understand.
$ vim Gruntfile.js
module.exports = function(grunt) {

    var devConfig = require('./dev/server/config');
    var testConfig = require('./test/server/config');
    var prodConfig = require('./dist/server/config');

    grunt.initConfig({
        pkg: grunt.file.readJSON('package.json'),

        clean: {
            tmp: ["tmp/*"],
            dev: [
                "dev/*",
                "!dev/server",           // ! = exclude
                "!dev/server/config",    // installation specific file, never modified programmatically
                "!dev/server/server.js"  // because of nodemon, we need to overwrite the file, not delete and copy
            ],
            dist: [
                "dist/*",
                "!dist/server",
                "!dist/server/config"
            ],
            test: [
                "test/*",
                "!test/server",
                "!test/server/config"
            ]
        },
        jade: {
            dev: {
                options: {
                    pretty: true,
                    data: {is_dev: true, host: devConfig.host}
                },
                files: {"tmp/index.html": "src/client/index.jade"}
            },
            prod: {
                options: {
                    pretty: true,
                    data: {is_prod: true}
                },
                files: {"tmp/index.html": "src/client/index.jade"}
            },
            test: {
                options: {
                    pretty: true,
                    data: {is_test: true}
                },
                files: {"tmp/index.html": "src/client/index.jade"}
            }
        },
        jshint: {
            files: [
                'Gruntfile.js',
                'src/client/**/*.js',
                'src/server/**/*.js',
                'spec/**/*.js'
            ]
        },
        copy: {
            dev: {
                files: [
                    {src: 'src/server/server.js', dest: 'dev/server/server.js'},
                    {src: 'tmp/client.concat.js', dest: 'dev/client/js/client.concat.js'},
                    {src: 'tmp/client.concat.css', dest: 'dev/client/css/client.concat.css'},
                    {expand: true, cwd: 'bower_components/bootstrap/', src: 'fonts/**', dest: 'dev/client/'},
                    {src: 'tmp/index.html', dest: 'dev/client/index.html'},
                    {expand: true, cwd: 'src/client/', src: 'partials/*', dest: 'dev/client/'}
                ]
            },
            dist: {
                files: [
                    {src: 'src/server/server.js', dest: 'dist/server/server.js'},
                    {src: 'tmp/client.min.js', dest: 'dist/client/js/client.min.js'},
                    {src: 'tmp/client.min.css', dest: 'dist/client/css/client.min.css'},
                    {expand: true, cwd: 'bower_components/bootstrap/', src: 'fonts/**', dest: 'dist/client/'},
                    {src: 'tmp/index.html', dest: 'dist/client/index.html'},
                    {expand: true, cwd: 'src/client/', src: 'partials/*', dest: 'dist/client/'}
                ]
            },
            test: {
                files: [
                    {src: 'src/server/server.js', dest: 'test/server/server.js'},
                    {src: 'tmp/client.min.js', dest: 'test/client/js/client.min.js'},
                    {src: 'tmp/client.min.css', dest: 'test/client/css/client.min.css'},
                    {expand: true, cwd: 'bower_components/bootstrap/', src: 'fonts/**', dest: 'test/client/'},
                    {src: 'tmp/index.html', dest: 'test/client/index.html'},
                    {expand: true, cwd: 'src/client/', src: 'partials/*', dest: 'test/client/'}
                ]
            }
        },
        watch: {
            files: [
                'Gruntfile.js',
                'src/**',
                'test/**'
            ],
            tasks: ['dev'],
            options: {
                livereload: 35729,
                spawn: false           // don't create a new process if one is already running
            }
        },
        concat: {
            js_app: {
                src: [
                    'src/client/js/main.js',
                    'src/client/js/controllers.js',
                    'src/client/js/services.js',
                    'src/client/js/directives.js'
                ],
                dest: 'tmp/app.concat.js'
            },
            js_vendor: {
                src: [
                    'bower_components/angular/angular.js',
                    'bower_components/angular-ui-router/release/angular-ui-router.js',
                    'bower_components/angular-mocks/angular-mocks.js',
                    'bower_components/jquery/dist/jquery.js',
                    'bower_components/bootstrap/dist/js/bootstrap.js',
                ],
                dest: 'tmp/vendor.concat.js'
            },
            js: {
                src: [
                    'tmp/vendor.concat.js',
                    'tmp/app.concat.js'
                ],
                dest: 'tmp/client.concat.js'
            },
            css: {
                src: ['bower_components/**/*.css', 'src/**/*.css'],
                dest: 'tmp/client.concat.css'
            }
        },
        uglify: {
            files: {src: ['tmp/client.concat.js'], dest: 'tmp/client.min.js'}
        },
        cssmin: {
            files: {src: ['tmp/client.concat.css'], dest: 'tmp/client.min.css'}
        },
        jasmine: {
            files: {src: 'tmp/app.concat.js'},
            options: {
                vendor: 'tmp/vendor.concat.js',
                specs: 'spec/unit/client/*.js',
                template: require('grunt-template-jasmine-istanbul'),
                templateOptions: {
                    coverage: 'coverage/coverage.json',
                    report: 'coverage'
                }
            }
        },
        jasmine_node: {
            server: ['spec/unit/server/']
        }
    });

    grunt.loadNpmTasks('grunt-contrib-clean');
    grunt.loadNpmTasks('grunt-contrib-jade');
    grunt.loadNpmTasks('grunt-contrib-jshint');
    grunt.loadNpmTasks('grunt-contrib-concat');
    grunt.loadNpmTasks('grunt-contrib-uglify');
    grunt.loadNpmTasks('grunt-contrib-cssmin');
    grunt.loadNpmTasks('grunt-contrib-watch');
    grunt.loadNpmTasks('grunt-contrib-copy');
    grunt.loadNpmTasks('grunt-contrib-jasmine');
    grunt.loadNpmTasks('grunt-jasmine-node');

    grunt.registerTask('dev', [
        'clean:tmp',
        'jade:dev',
        'jshint',
        'concat_all',
        'clean:dev',
        'copy:dev',
        'watch'
    ]);

    grunt.registerTask('prod', [
        'clean:tmp',
        'jade:prod',
        'jshint',
        'concat_all',
        'uglify',
        'cssmin',
        'clean:dist',
        'copy:dist'
    ]);

    grunt.registerTask('test', [
        'clean:tmp',
        'jade:test',
        'jshint',
        'concat_all',
        'uglify',
        'cssmin',
        'clean:test',
        'copy:test',
        'jasmine',
        'jasmine_node:server'
    ]);

    grunt.registerTask('concat_all', [
        'concat:js_app',
        'concat:js_vendor',
        'concat:js',
        'concat:css',
    ]);

};
It's recommended to backup the source code files before running the tasks because in the worst case grunt can delete all the files.
There are three grunt tasks now: grunt dev, grunt prod and grunt test. Before analyzing what's happening when running them, we need to make a few file modifications. Replace the current JS and CSS file links by the lines below.
$ vim src/client/index.jade
if is_dev
    link(href="css/client.concat.css", rel="stylesheet")
else
    link(href="css/client.min.css", rel="stylesheet")
if is_dev
    script(src="js/client.concat.js")
    script(src="//#{host}:35729/livereload.js")
else
    script(src="js/client.min.js")
Also because from now on the index.html:s are generated and output to own environment directories, we don't need to separate them in server.js anymore. Also one line can be removed.
$ vim src/server/server.js
router.use(function(req, res) {
    res.sendFile(path.join(__dirname, '../client/index.html'));
});
// remove this line
router.use(express.static(path.join(__dirname, '../../bower_components')));
grunt dev
grunt dev runs the following tasks respectively: clean:tmp, jade:dev, jshint, concat_all, clean:dev, copy:dev and watch. Each task can be also run individually like grunt clean:tmp.
clean:tmpempties thetmpdirectory.jade:devgenerates anindex.htmlfile withis_dev: trueparameter and saves the file to atmp/clientdirectory.jshintvalidates the JS files.concat_allruns theconcat_alltask which runs its sub-tasks.concat:js_appconcatenates the application JS files.concat:js_vendorconcatenates the vendor JS files.concat:jsconcatenates the application and the vendor JS files.concat:cssconcatenates the CSS files.
clean:devempties thedevdirectory preservingconfig(installation specific data) andserver.js(because of nodemon).copy:devcopies all the relevant files to thedev.server.jsis overwritten and thanks to nodemon it's automatically restarted.watchwatches the editable files and re-runsgrunt devif some of the files were changed.
So, to start the development environment, run the next command, and then open the page (http://domain.com:3001).
$ grunt dev
Next let's edit and save some of the source files and see how grunt automatically validates the files and builds a new development distribution.
We can go further by utilizing livereload to get the browser to automatically update the page when something is changed (reference). Because Gruntfile.js and index.jade already support livereload, we only need to update the domain to the config files, in the host parameter.
$ vim dev/server/config
config.host = 'domain.com';
From now on the server file must be run from the dev directory. A --watch argument makes nodemon to restart only if the dev/server/server.js file is changed because the other files, the frontend files, are watched by grunt.
$ nodemon --watch dev/server/server.js dev/server/server.js
Now after editing the index.jade file we should see a miracle: the browser updates the page itself and the edit is there.
grunt prod
Next we have a procedure of generating the production build.
clean:tmpempties thetmpdirectory.jade:prodgenerates anindex.htmlfile withis_prod: trueparameter and saves the file to atmp/clientdirectory.jshintvalidates the JS files.concat_allruns theconcat_alltask (seegrunt dev).uglifyminifies the client JS files.cssminminifies the client CSS files.clean:distempties thedistdirectory preservingconfig(installation specific data).copy:distcopies the relevant files to thedist.
There are many similarities between the dev and prod tasks. The main difference is that in production the CSS and JS files are minified when in development they are concatenated to ease debugging.
To start the production environment, run the next command, and then open the page (http://domain.com:3000). In case of an error, read the next chapter before debugging it too much.
$ grunt prod
If we had more environments such as staging, we could create own tasks and directories for them as well. Grunt is actually even able to copy the files over SSH so it could be possible to have tasks like dist-staging and dist-production which copied the files wherever needed.
forever
UPDATE (2018): Check out pm2 (reference).
In development we are using nodemon, grunt-contrib-watch and livereload.js to ease the developing work but in production we have different needs.
In production we don't restart the server when the files change but when the system crashes in case of a server or network error. In production we won't have a open terminal window running either. These requirements are achieved by forever (reference).
$ npm install forever --save
Start the server.
$ forever start --uid "simpleform" --append -l /var/log/simpleform/forever.log -o /var/log/simpleform/debug.log -e /var/log/simpleform/error.log dist/server/server.js
To restart the server manually, run the next commands. This is needed to be done when a new production build is deployed.
$ forever list
$ forever restart simpleform
If everything is right, we should see a production version running in the http://domain.com:3000.

A production version where the notification bar is visible only for demonstration.
grunt test
Finally we have a grunt task for the test environment which is analyzed next. The actual testing will be discussed later in the Testing chapter.
$ grunt test
clean:tmpempties thetmpdirectory.jade:testgenerates anindex.htmlfile withis_test: trueparameter and saves the file to atmp/clientdirectory.jshintvalidates the JS files.concat_allruns theconcat_alltask (seegrunt dev).uglifyminifies the client JS files.cssminminifies the client CSS files.clean:testempties thetestdirectory preservingconfig(installation specific data).copy:testcopies the relevant files to thetest.jasmineruns the frontend unit tests and generates code coverage files to thecoveragedirectory.jasmine_node:serverruns the backend unit tests.
As we don't have any tests written yet, there is no point to run the task now.
MySQL
This chapter is skippable. We don't really need data from the MySQL database in this project but it's here for educational reasons. So, let's pretend we have a users table in the database and we want to serve the list in the /users path (http://domain.com:3001/users).
Remember to add the MySQL credentials to the config files. Then install the required node modules and edit the server.js file.
$ npm install mysql --save
$ npm install express-myconnection --save
$ vim src/server/server.js
var mysql = require('mysql');
var myConnection = require('express-myconnection');

var config = require('./config');
app.use(myConnection(mysql, config.mysql, 'pool'));
router.use('/users', function(req, res, next) {
    req.getConnection(function(err, connection) {
        connection.query('SELECT * FROM users', function(err, results) {
            if (err) {
                return next(err);
            }
            return res.json(results);
        });
    });
});
router.use(function(req, res, next) {
    res.sendFile(path.join(__dirname, '../client/index.html'));
});
The Application
Finally it's time to start coding the business logic itself. We are going to build a form with a few basic static fields and some dynamically generated fields from a JSON data file. When the form is submitted, the data is emailed to an email address we configure.
Because this article is more about the stack than angular coding, we are not diving into the details of the application logic.
Data
At first we create a JSON file. To save some internet space the file is included here as minified. Paste it to JSONLint to make it human readable (reference).
$ vim data/form1.json
[{"label":"What's your biggest concern?","id":"main-concern","name":"mainConcern","type":"select","options":[{"label":"Health","value":"health","nextFields":["health"]},{"label":"Money","value":"money","nextFields":["money"]},{"label":"Wife","value":"wife","nextFields":["nothing-to-do"]}]},{"label":"Oh damn, what's wrong with you?","id":"health","name":"health","type":"select","options":[{"label":"Back pain","value":"back-pain","nextFields":["sport-hours-per-week","health-backpain-submit"]},{"label":"Sanity","value":"sanity","nextFields":["age","poem","health-sanity-submit"]}]},{"label":"Poor man! What's the problem?","id":"money","name":"money","type":"select","options":[{"label":"I've got too little","value":"too-little","nextFields":["money-toolittle-submit"]},{"label":"I've got too much","value":"too-much","nextFields":["money-toomuch-submit"]}]},{"label":"Sorry, nothing to do.","id":"nothing-to-do","name":"nothingToDo","value":"period","type":"hidden"},{"label":"How many hours of sport you do per week?","id":"sport-hours-per-week","name":"sportHoursPerWeek","type":"radio","options":[{"label":"less than 5","value":"less-than-5"},{"label":"more than 5 or 5","value":"more-than-5"}]},{"label":"What's your age?","id":"age","name":"age","type":"text"},{"label":"Write a poem.","id":"poem","name":"poem","type":"textarea"},{"label":"","id":"health-backpain-submit","name":"submit","type":"submit"},{"label":"","id":"health-sanity-submit","name":"submit","type":"submit"},{"label":"","id":"money-toomuch-submit","name":"submit","type":"submit"},{"label":"","id":"money-toolittle-submit","name":"submit","type":"submit"}]
Backend code needs to return the data for the frontend.
$ vim src/server/server.js
var fs = require('fs');
router.get('/form/:id', function(req, res, next) {
	var sanitizedId = +(req.params.id)
    fs.readFile(config.dataPath + 'form' + sanitizedId + '.json', {encoding: 'utf8'}, function(err, data) {
        return res.json(JSON.parse(data));
    });
});
Now we get the data in http://domain.com:3001/form/1.
Form
Before the actual code, let's install yet another component, angular-ui-router, because internet recommends it (reference).
$ bower install angular-ui-router --save
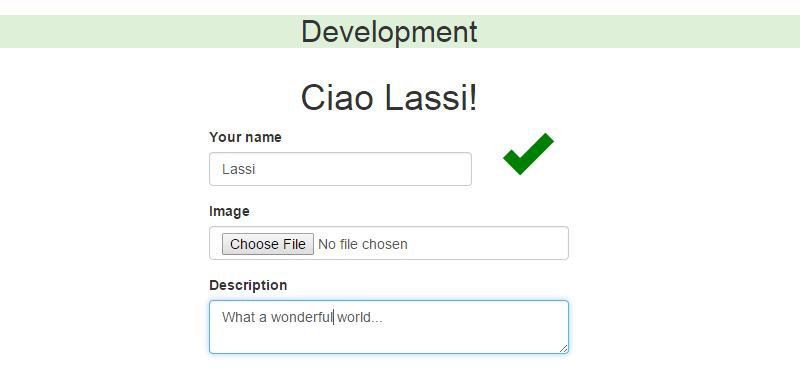
As told earlier, index.html is just a landing page and angular handles the rest, the views, the routing, the rendering, everything basicly. Let's modify the file and move the form to the src/client/partials/form.html file. Add also a few new static form input elements (Image, Description).
$ vim src/client/partials/form.html
<form role="form", ng-controller="FormController">

    <h1 class="text-center">Ciao !</h1>

    <div class="form-group">
        <div class="row">
            <div class="col-sm-9">
                <label for="name">Your name</label>
                <input type="text" ng-model="name" id="name" class="form-control">
            </div>
            <div class="col-sm-3">
                <span ng-show="name" class="glyphicon glyphicon-ok nameGiven"></span>
            </div>
        </div>
    </div>
    <div class="form-group">
        <label>Image</label>
        <input type="file" name="file" class="form-control">
    </div>
    <div class="form-group">
        <label>Description</label>
        <textarea ng-model="description" name="description" class="form-control"></textarea>
    </div>
</form>
$ vim src/client/index.jade
doctype html
html(lang="en", ng-app="simpleform")
    head
        meta(charset="utf-8")
        meta(http-equiv="X-UA-Compatible", content="IE=edge")
        meta(name="viewport", content="width=device-width, initial-scale=1")
        if is_dev
            link(href="css/client.concat.css", rel="stylesheet")
        else
            link(href="css/client.min.css", rel="stylesheet")
        body
           .container
               .row
                   if is_prod
                       h2(class="text-center bg-danger") Production
                   else if is_test
                       h2(class="text-center bg-danger") Test
                   else
                       h2(class="text-center bg-success") Development
               .row
                   div(class="col-sm-4 col-sm-offset-4")
                       div(ui-view)

        if is_dev
            script(src="js/client.concat.js")
            script(src="//#{host}:35729/livereload.js")
        else
            script(src="js/client.min.js")
Next we create two JS files for the frontend: main.js is where the frontend application module is created and in controllers.js we have frontend controllers.
$ vim src/client/js/main.js
var app = angular.module('simpleform', ['ui.router']);

app.config(['$stateProvider', function($stateProvider) {
    $stateProvider.state('front', {
        url: "",
        templateUrl: "partials/form.html",
        controller: 'FormController'
    });
}]);
$ vim src/client/js/controllers.js
app.controller('FormController', function($scope) {

    function init() {}

    init();

});
After this we have the form markup coming from the form.html file served by a FormController controller.
Dynamic fields
We have a form with three static fields at the moment. But we want to generate more fields dynamically from the JSON data.
$ vim src/client/partials/form.html
...
    <textarea ng-model="description" name="description" class="form-control"></textarea>
</div>
<div class="form-group" ng-repeat="field in form" ng-show="field.show || $first">
    <label></label>
    <select ng-if="field.type == 'select'" ng-model="field.value" ng-change="showNextFields(field)" name="{{ field.name }}" id="{{ field.id }}" class="form-control">
        <option value=""></option>
        <option ng-repeat="option in field.options" value="{{ option.value }}"></option>
    </select>
    <input ng-if="field.type == 'text'" ng-model="field.value" type="text" name="{{ field.name }}" value="{{ field.value }}" id="{{ field.id }}" class="form-control">
    <input ng-if="field.type == 'hidden'" ng-model="field.value" type="hidden" name="{{ field.name }}" value="{{ field.value }}" id="{{ field.id }}" class="form-control">
    <textarea ng-if="field.type == 'textarea'" ng-model="field.value" name="{{ field.name }}" id="{{ field.id }}" class="form-control"></textarea>
    <div ng-if="field.type == 'radio'" ng-repeat="option in field.options" id="{{ field.id }}" class="radio">
        <label><input type="radio" ng-model="field.value" name="{{ field.name }}" value="{{ option.value }}"> </label>
    </div>
    <input ng-if="field.type == 'submit'" type="submit" name="{{ field.name }}" id="{{ field.id }}" value="Submit" class="btn btn-primary btn-lg btn-block">
</div>
$ vim src/client/js/controllers.js
app.controller('FormController', ['$scope', '$http', function($scope, $http) {

    function init() {
        $scope.form = [];
        $http.get('/form/1').then(function(data) {
            $scope.form = data.data;
        });
    }

    $scope.showNextFields = function(field) {
        var options = field.options;

        var i, j, k = 0;

        // first find field's nextFields
        var nextFields = [];
        for (i = 0; i < options.length; i++) {
            if (options[i].value == field.value) {
                if (typeof options[i].nextFields !== "undefined") {
                    nextFields = options[i].nextFields;
                }
                i = options.length;
            }
        }

        // show the field itself and the nextStep fields but hide the rest
        for (j = 0; j < $scope.form.length; j++) {
            if ($scope.form[j].id == field.id) {
                $scope.form[j].show = true;
            } else {
                $scope.form[j].show = false;
                // show the nextStep fields
                for (i = 0; i < nextFields.length; i++) {
                    if ($scope.form[j].id == nextFields[i]) {
                        $scope.form[j].show = true;
                    }
                }
            }
        }
        // show all the fields whose child field in nextField tree is shown
        for (j = 0; j < $scope.form.length; j++) {
            var maxIterations = 100;
            if (isChildFieldShown($scope.form[j].id, maxIterations)) {
                $scope.form[j].show = true;
            }
        }
        // empty values of hidden fields
        for (j = 0; j < $scope.form.length; j++) {
            if ($scope.form[j].show === false) {
                if (typeof $scope.form[j].value !== 'undefined') {
                    $scope.form[j].value = '';
                }
            }
        }
    };

    function isChildFieldShown(fieldId, maxIterations) {
        if (maxIterations-- < 0) {
            return false;
        }
        var form = $scope.form;
        var i, j, k = 0;

        for (k = 0; k < form.length; k++) {
            if (form[k].id != fieldId) {
                continue;
            }

            if (form[k].show) {
                return true;
            }

            if (typeof form[k].options !== "undefined" && form[k].options) {
                for (j = 0; j < form[k].options.length; j++) {
                    if (typeof form[k].options[j].nextFields !== "undefined" && form[k].options[j].nextFields) {
                        for (i = 0; i < form[k].options[j].nextFields.length; i++) {
                            if (isChildFieldShown(form[k].options[j].nextFields[i], maxIterations)) {
                                return true;
                            }
                        }
                    }
                }
            }
        }

        return false;
    }

    init();

}]);
Now the form is generated dynamically from the JSON data.
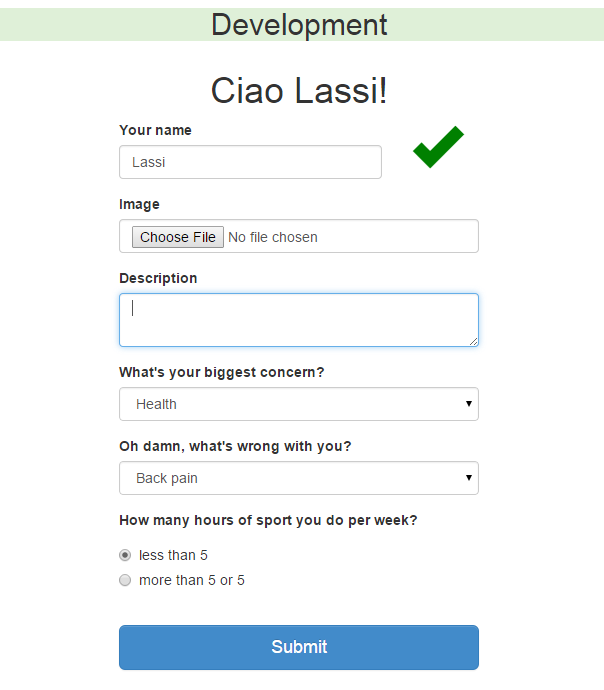
A form with dynamically generated fields.
Submit and file upload
Because the form has a file upload, we need a new module: multiparty (reference). We also need several file modifications.
$ npm install multiparty --save
$ vim src/client/partials/form.html
<form role="form" ng-submit="submit()" ng-controller="FormController">
...
<input type="file" name="file" class="form-control" file-model="file">
...
<input ng-if="field.type == 'submit'" type="submit" name="{{ field.name }}" id="{{ field.id }}" value="Submit" class="btn btn-primary btn-lg btn-block" ng-disabled="fileUploading">
$ vim src/client/js/controllers.js
app.controller('FormController', ['$scope', '$http', 'fileUpload', function($scope, $http, fileUpload) {
...
$scope.submit = function() {
    $scope.fileUploading = true;

    $scope.fields = [];
    if (typeof $scope.description !== 'undefined') {
        $scope.fields.push({description: $scope.description});
    }
    if (typeof $scope.name !== 'undefined') {
        $scope.fields.push({name: $scope.name});
    }

    for (var i = 0; i < $scope.form.length; i++) {
        if (typeof $scope.form[i].value !== 'undefined' && $scope.form[i].value !== '') {
            var obj = {};
            obj[$scope.form[i].name] = $scope.form[i].value;
            $scope.fields.push(obj);
        }
    }

    fileUpload.uploadFileToUrl('/answer', $scope.fields, $scope.file, function(response) {
        $scope.fileUploading = false;
    }, function(response) {
    });
};
$ vim src/client/js/directives.js
app.directive('fileModel', ['$parse', function ($parse) {
    return {
        restrict: 'A',
        link: function(scope, element, attrs) {
            var model = $parse(attrs.fileModel);
            var modelSetter = model.assign;

            element.bind('change', function(){
                scope.$apply(function(){
                    modelSetter(scope, element[0].files[0]);
                });
            });
        }
    };
}]);
$ vim src/client/js/services.js
app.service('fileUpload', ['$http', function ($http) {
    this.uploadFileToUrl = function(url, fields, file, success, error){
        var fd = new FormData();
        for (var i = 0; i < fields.length; i++) {
            for (var key in fields[i]) {
                fd.append(key, fields[i][key]);
            }
        }
        if (file) {
            fd.append('file', file);
        }

        $http({
            url: url,
            method: "POST",
            data: fd,
            transformRequest: angular.identity,
            headers: {'Content-Type': undefined}
        }).then(
            function(res) {success(res);},
            function(res) {error(res);}
        );
    };
}]);
$ vim src/server/server.js
var multiparty = require('multiparty');
...
// route: form handler
router.post('/answer', function(req, res) {
    var form = new multiparty.Form();

    form.parse(req, function(error, fields, files) {
        console.log(error, fields, files);
        res.end();
    });
});
Now the Submit button is making a request and the uploaded file is transfered to the /tmp/ directory in the server. Because of the console.log in the server.js you should see a debug message.
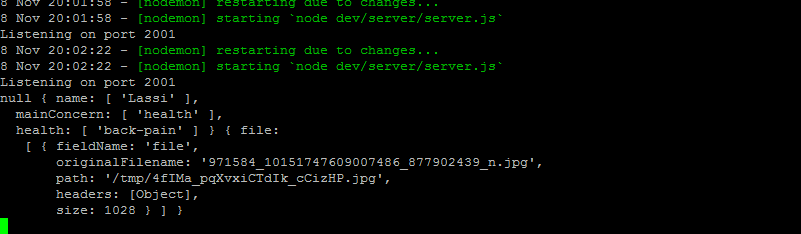
A debug message of the file submit.
Emailing
Then we add emailing. Remember to update your Gmail credentials and email settings to the config files.
$ npm install nodemailer --save
$ vim src/server/server.js
var nodemailer = require('nodemailer');
...
// route: form handler
router.post('/answer', function(req, res) {
    var form = new multiparty.Form();

    form.parse(req, function(error, fields, files) {
        var body = '';
        for (var key in fields) {
            body += key.toUpperCase() + ': ' + fields[key] + "\n";
        }

        var filesArr = typeof files.file !== 'undefined' ? files.file : [];
        sendEmail(body, filesArr, function(info) {
            if (filesArr && filesArr[0] && typeof filesArr[0].path !== 'undefined') {
                fs.unlink(filesArr[0].path);
            }
        });
        res.end();
    });
});

var sendEmail = function(body, files, next) {
    var transporter = nodemailer.createTransport({
        service: 'Gmail',
        auth: {
            user: config.gmail.username,
            pass: config.gmail.password
        }
    });

    var attachments = [];
    for (var i = 0; i < files.length; i++) {
        attachments.push({
            filename: files[i].originalFilename,
            path: files[i].path
        });
    }

    var emailOptions = {
        from: config.email.fromName + ' <' + config.email.fromEmail + '>',
        to: config.email.to,
        subject: config.email.subject,
        text: body,
        attachments: attachments
    };

    transporter.sendMail(emailOptions, function(error, info){
        if (error){
            console.log(error, info);
            next(info, error);
        } else {
            console.log('Message sent: ' + info.response);
            next(info);
        }
    });
};
And the application is ready. The submitted data is emailed to the configured email address (config.email.to).
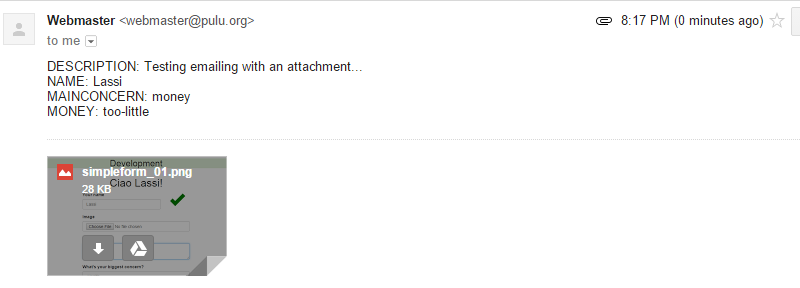
The email was received.
Testing
One of the hardest part of web development is testing. Technically it's difficult to be on the higher abstraction level of the software which is usually needed for testing. The difficulty is highly dependant on the software design and modularity but even if the software is "perfectly" designed and implemented there are usually many integrations to other systems which need to be mocked and that takes time.
But even more crucial challenges are not technical but economical and related to risk analysis because in real world it's not reasonable or even possible to test everything (unless you are sending a spaceship to the moon).
The bottom line is to figure out what are the most important functions of the software and which of them are most likely to fail. In other words, what parts of the system has the best Return of Investment (aka ROI) to test?
There are code coverage tools like Istanbul (reference) which measure how large part of the software is executed when the tests are run. The code coverage tools serve some insights but the real software quality can't be evaluated only in quantitative manner because at first some trivial codes are just waste of time to test, and at second important and complex functions should be tested thoroughly in many different ways and inputs.
In this project we will write unit tests both for the frontend and the backend. In addition we will do end-to-end testing for the whole process: from an user interaction to verify the email box status.
If you haven't created the test/server/config file yet, go and do it now. env is "test" and port could be 3002. The rest can be copied from the dev/server/config file.
Unit testing (frontend)
To test the frontend we need a new module.
$ bower install angular-mocks --save
In the Grunt chapter of this article we installed jasmine (reference) and istanbul (reference).
Jasmine is a testing framework using a headless browser phantomjs (reference) which can be run in console. The code coverage tool Istanbul can be integrated with Jasmine. There is also mocha (reference).
It's also possible to use a test runner karma (reference) with Jasmine if the tests are required to be run in real browsers (karma-cli, karma, karma-jasmine, karma-chrome-launcher, grunt-karma). However we are happy with PhantomJS which uses the same JS interpreter (WebKit) as Chrome (not exactly true) and Safari.
$ vim spec/unit/client/controllers.js
describe('Unit: FormController', function() {
    beforeEach(module('simpleform'));

    var ctrl, scope, httpBackend;
    beforeEach(inject(function($injector) {
        scope = $injector.get('$rootScope').$new();

        createController = function() {
             return $injector.get('$controller')('FormController', {$scope: scope });
        };

        httpBackend = $injector.get('$httpBackend');

        // GET /form/1
        var form = [{label:"What's your biggest concern?",id:"main-concern",name:"mainConcern",type:"select",options:[{label:"Health",value:"health",nextFields:["health"]},{label:"Money",value:"money",nextFields:["money"]},{label:"Wife",value:"wife",nextFields:["nothing-to-do"]}]},{label:"Oh damn, what's wrong with you?",id:"health",name:"health",type:"select",options:[{label:"Back pain",value:"back-pain",nextFields:["sport-hours-per-week","health-backpain-submit"]},{label:"Sanity",value:"sanity",nextFields:["age","poem","health-sanity-submit"]}]},{label:"Poor man! What's the problem?",id:"money",name:"money",type:"select",options:[{label:"I've got too little",value:"too-little",nextFields:["money-toolittle-submit"]},{label:"I've got too much",value:"too-much",nextFields:["money-toomuch-submit"]}]},{label:"Sorry, nothing to do.",id:"nothing-to-do",name:"nothingToDo",value:"period",type:"hidden"},{label:"How many hours of sport you do per week?",id:"sport-hours-per-week",name:"sportHoursPerWeek",type:"radio",options:[{label:"less than 5",value:"less-than-5"},{label:"more than 5 or 5",value:"more-than-5"}]},{label:"What's your age?",id:"age",name:"age",type:"text"},{label:"Write a poem.",id:"poem",name:"poem",type:"textarea"},{label:"",id:"health-backpain-submit",name:"submit",type:"submit"},{label:"",id:"health-sanity-submit",name:"submit",type:"submit"},{label:"",id:"money-toomuch-submit",name:"submit",type:"submit"},{label:"",id:"money-toolittle-submit",name:"submit",type:"submit"}];
        httpBackend.when("GET", "/form/1").respond(form);
    }));

    afterEach(function() {
        httpBackend.verifyNoOutstandingExpectation();
        httpBackend.verifyNoOutstandingRequest();
    });

    it('should return error and leave fileUploading true',
    function() {
        expect(scope.fileUploading).not.toBeDefined();
        var controller = createController();
        httpBackend.expect("POST", "/answer").respond(500);
        scope.submit();
        httpBackend.flush();
        expect(scope.fileUploading).toBe(true);
    });

    it('should return success and set fileUploading false',
    function() {
        var controller = createController();
        httpBackend.expect("POST", "/answer").respond(200);
        scope.submit();
        httpBackend.flush();
        expect(scope.fileUploading).toBe(false);
    });

    it('should handle form fields\' shows and values',
    function() {
        var controller = createController();
        httpBackend.flush(); // GET /form/1

        var poemFieldIdx, healthFieldIdx, moneyFieldIdx, mainConcernFieldIdx;
        for (var i = 0; i < scope.form.length; i++) {
            if (scope.form[i].id == 'main-concern') {
                mainConcernFieldIdx = i;
            } else if (scope.form[i].id == 'health') {
                healthFieldIdx = i;
            } else if (scope.form[i].id == 'money') {
                moneyFieldIdx = i;
            } else if (scope.form[i].id == 'poem') {
                poemFieldIdx = i;
            } else if (scope.form[i].id == 'sanity') {
                sanityFieldIdx = i;
            }
        }

        scope.form[healthFieldIdx].value = 'sanity'; // sanity option selected
        scope.showNextFields(scope.form[healthFieldIdx]);
        scope.form[poemFieldIdx].value = 'This is a poem';

        scope.description = 'This is a description.';
        scope.name = 'Lassi';

        scope.submit();

        expect(scope.form[mainConcernFieldIdx].show).toBe(true);
        expect(scope.form[healthFieldIdx].show).toBe(true);
        expect(scope.form[moneyFieldIdx].show).toBe(false);
        expect(scope.form[poemFieldIdx].show).toBe(true);

        httpBackend.expect("POST", "/answer").respond(200);
        httpBackend.flush(); // POST /answer

        expect(scope.fields[0].description).toBe('This is a description.');
        expect(scope.fields[1].name).toBe('Lassi');
        expect(scope.fields[2].health).toBe('sanity');
        expect(scope.fields[3].poem).toBe('This is a poem');
    });

});
The tests can be run by grunt test command. The code coverage report files are generated into the coverage directory. Open the directory in the browser to see the charts.

Frontend unit tests passed.
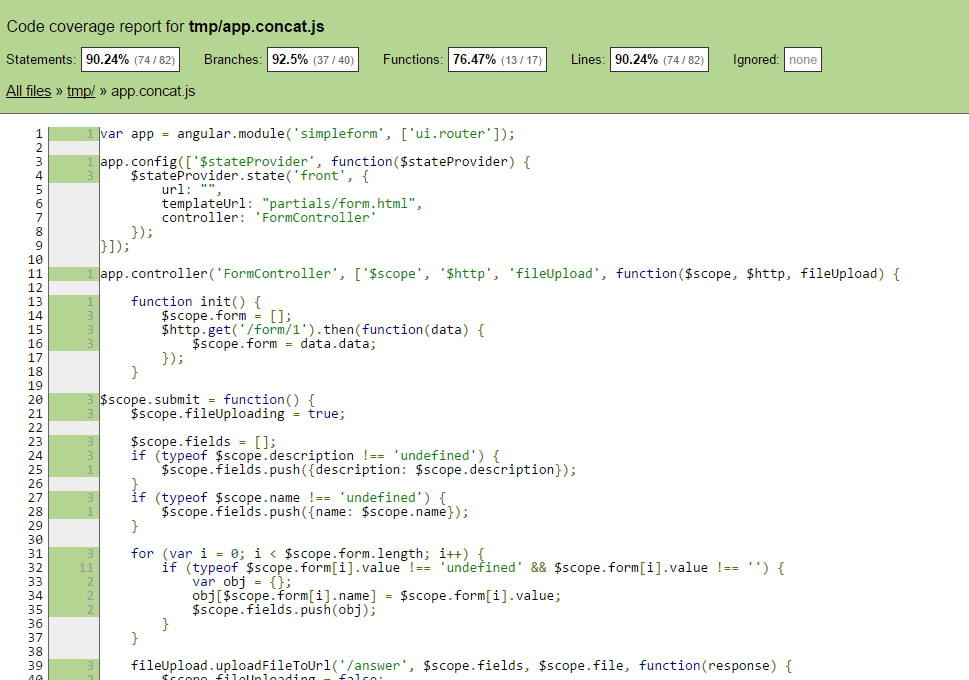
A code coverage report by Istanbul.
Unit testing (backend)
In the backend unit tests we need a runt-jasmine-node module which was already installed in Grunt chapter. It makes it possible to use Jasmine testing framework for the backend code.
$ mkdir spec/data; echo "some test data" > spec/data/sample1.txt
$ npm install request --save-dev
$ vim spec/unit/server/server.spec.js
var request = require('request');
var fs = require('fs');

var config = require('../../../test/server/config');
var server = require(config.basePath + '/test/server/server.js');

describe('server', function() {

    var baseUrl = 'http://' + config.host + ':' + config.port;

    it("should response form json", function(done) {
        request.get(baseUrl + '/form/1', function(error, response) {
            expect(response.body).toMatch(/nextFields":\["money\-toolittle\-submit"\]\},\{"label":"I\'ve got too much/);
            done();
        });
    });

    it("should response index page", function(done) {
        request.get(baseUrl + '/', function(error, response) {
            expect(response.body).toMatch(/Test/);
            expect(response.body).toMatch(/div ui-view/);
            done();
        });
    });

    it("should email form data", function(done) {
        var formData = {
            name: 'Matti Kutonen',
            description: 'Dataa',
            something: 'else',
            file: fs.createReadStream(config.basePath + 'spec/data/sample1.txt'),
        };

        request.post({url: baseUrl + '/answer', formData: formData}, function(error, response) {
            done();
        });
    });

});
And again the tests are run by the grunt test command.
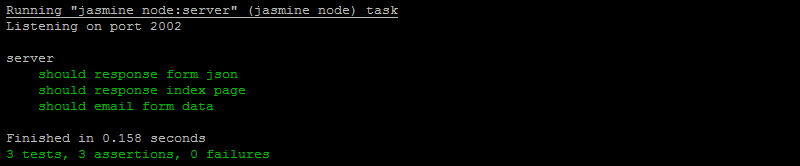
Backend unit tests passed.
End-to-end testing
End-to-end testing means testing the whole application logic (E2E). In the application level it means opening the page, selecting and filling the form fields, submitting the form and finally checking the email box. Many sources suggest using protractor which ought to be perfect for angular projects (reference).
WARNING: Don't try this at home.
Protractor requires Selenium WebDriver (reference) which I've had troubles with a few times before and therefore I wasn't very eager to install it. After reading the angular team recommends Protractor anyway with Selenium I was encouraged enough to try it one more time. So let's install it and start the selenium.
$ npm install protractor
$ ./node_modules/protractor/bin/webdriver-manager update
$ ./node_modules/protractor/bin/webdriver-manager start
...
throw er; // Unhandled 'error' event
...
Promising. A very good error report. Let's google. Aha, we need some JDK installed. No mention about this in the official tutorial on Protractor page. Let's install it. Because I have Debian 6.0 the default version for JDK is 6 when 7 is the latest stable.
$ sudo apt-get install openjdk-6-jdk
Then we copy the sample spec and config files from the Protractor page.
$ vim todo-spec.js
describe('angularjs homepage todo list', function() {
  it('should add a todo', function() {
    browser.get('http://www.angularjs.org');

    element(by.model('todoText')).sendKeys('write a protractor test');
    element(by.css('[value="add"]')).click();

    var todoList = element.all(by.repeater('todo in todos'));
    expect(todoList.count()).toEqual(3);
    expect(todoList.get(2).getText()).toEqual('write a protractor test');
  });
});
$ vim conf.js
exports.config = {
  seleniumAddress: 'http://localhost:4444/wd/hub',
  specs: ['todo-spec.js']
};
And then we can test it.
$ ./node_modules/protractor/bin/protractor conf.js
...
error while loading shared libraries: libgconf-2.so.4: cannot open shared object file: No such file or directory
21:05:18.551 ERROR - org.apache.commons.exec.ExecuteException: Process exited with an error: 127 (Exit value: 127)
...
[launcher] Error: UnknownError: null
....
I hate Selenium. I knew this. All the other modules and components during the process of making this article have been working like charm but this is something special. Really special. Let's google.
We seem the be missing libconf2-4. Come again? Do we really need to install this scary looking library to get angular e2e tests working? I'm not a sysadmin but what I know is that you should be really cautious with these kind of things because you can get your system messed up if you don't know what you are doing. And I don't know what I'm doing. But you don't learn without trying so let's install it and rerun the test.
$ sudo apt-get install libgconf2-4
$ ./node_modules/protractor/bin/protractor conf.js
/usr/lib/libstdc++.so.6: version `GLIBCXX_3.4.15' not found (required by chromedriver)
/usr/lib/libnss3.so: version `NSS_3.14.3' not found (required by chromedriver)
21:28:04.769 ERROR - org.apache.commons.exec.ExecuteException: Process exited with an error: 1 (Exit value: 1)
ARGARHARGGHRAHHHRAHR. Enough. Burn in hell. No e2e testing this time.
Final words
The project is completed. We built a small form which submits data to an email box. There are three environments (dev, prod, test) which can be used efficiently. The final source codes are available (reference).
End-to-end testing is something we didn't achieve eventhough it was set as a goal. The reason to fail with it is maybe too old Debian version (6.0) but then again, how this can be so difficult? Perhaps it's because Protractor uses native browsers (which is nice). It's also possible to do the testing with PhantomJS, for example, but it doesn't use browsers natively. UPDATE (2023): Playwright.
I would have liked to run the application in sub-domains without the ugly ports in the URL but because it isn't apparently possible to do without nginx (or other web server) it was skipped.
What we learnt are the basics of AngularJS as well as Grunt, Bootstrap, nodejs, unit testing with Jasmine, npm and Bower. If I kept on trying new things I would check out MongoDB, Batarang, Restangular, Ember, React, Gulp, Yeoman. UPDATE (2018): Today I recommend React, MongoDB, Webpack and hapi.js.
I'm a bit worried what will happen with all the different modules and their dependencies when the time goes on. After a year or two I will probably want to update Angular or nodejs but if some of the core modules of the project has not been updated, the angular update can get nasty. We will see.